
DWMS Racing RD350 Cafe Racer Build! We Are Building The New Fiberglass Tail Section!
Page 1 of 2 • 1, 2 ![]()

DWMS Racing RD350 Cafe Racer Build! We Are Building The New Fiberglass Tail Section!
![]() by joeyputt Thu Jan 03, 2013 8:11 pm
by joeyputt Thu Jan 03, 2013 8:11 pm
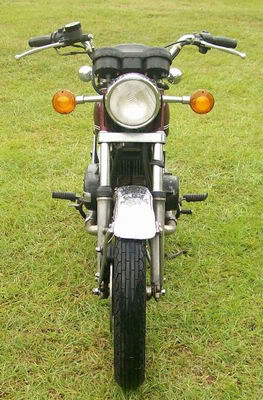
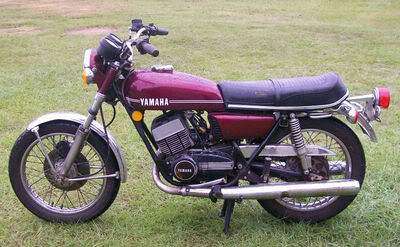
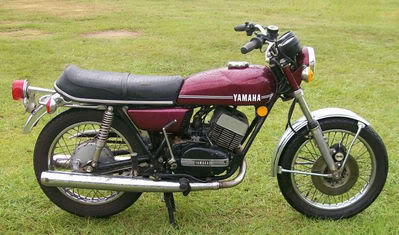
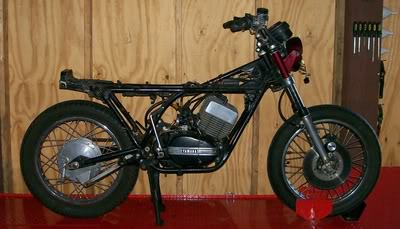
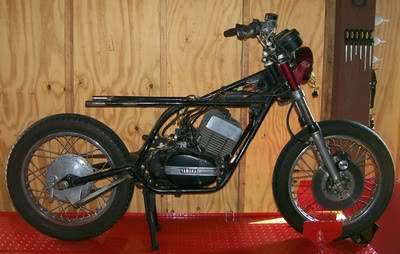
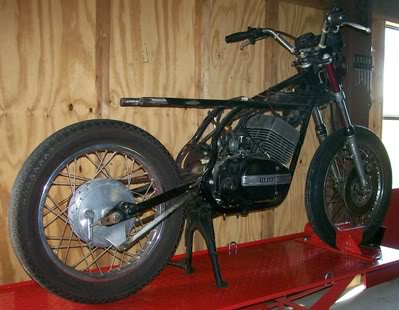
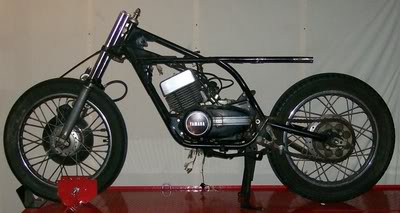
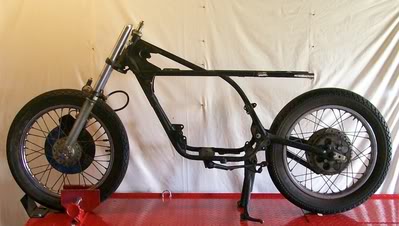
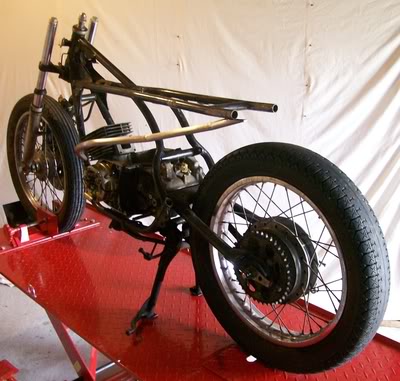
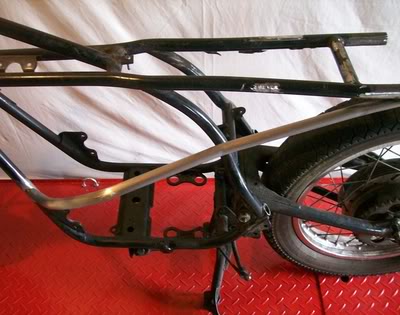
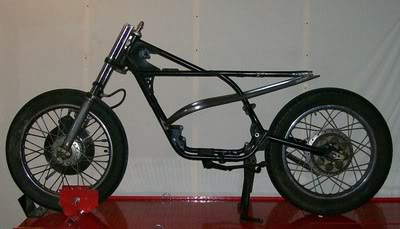
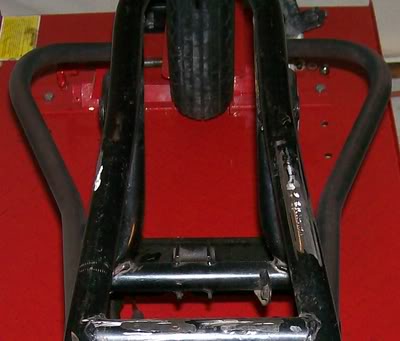
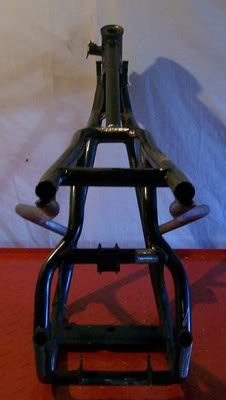
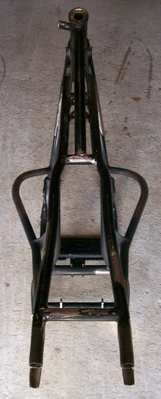
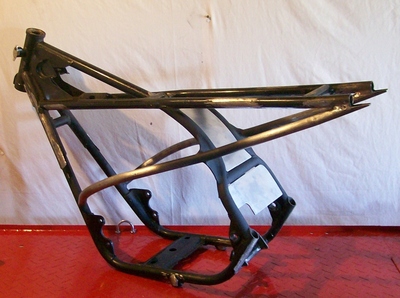
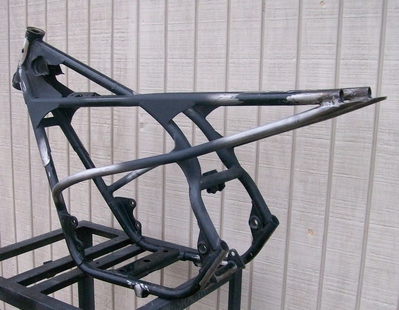
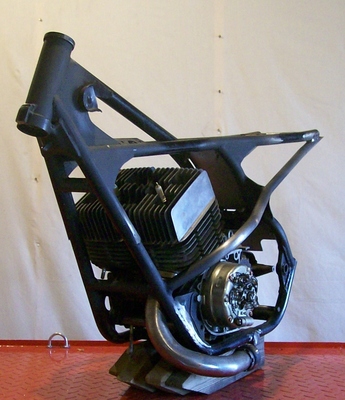
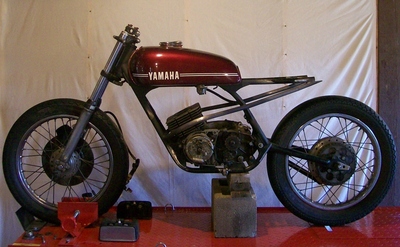
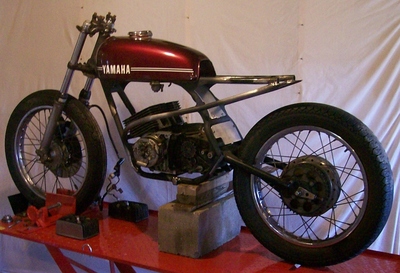
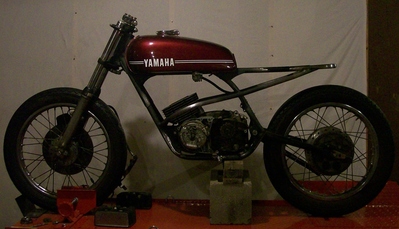
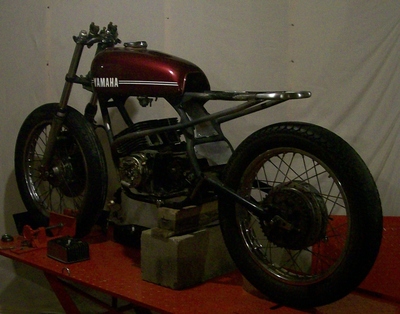
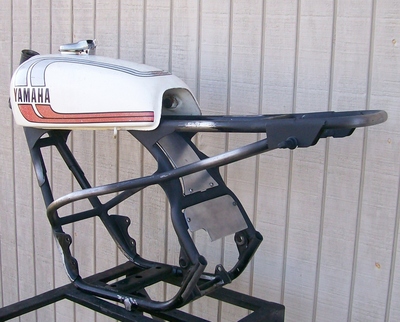
Here are some photos of the bike that we started with.

Last edited by joeyputt on Wed Mar 20, 2013 8:51 pm; edited 5 times in total

joeyputt- Leading the Pack
- Posts : 755
Join date : 2010-08-25
Location : South of Dothan -

Re: DWMS Racing RD350 Cafe Racer Build! We Are Building The New Fiberglass Tail Section!
![]() by joeyputt Thu Jan 03, 2013 8:12 pm
by joeyputt Thu Jan 03, 2013 8:12 pm
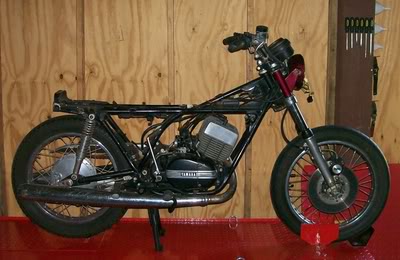
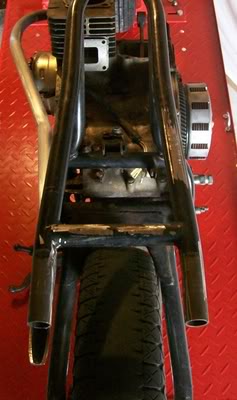
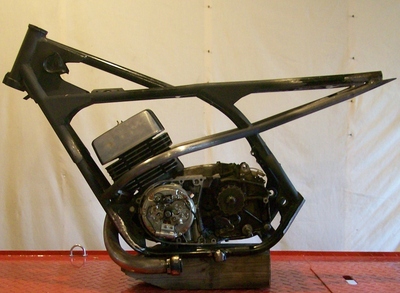
I removed the headers, mufflers, front foot pegs and mounting bar, rear foot pegs, shifter, brake pedal, rear shocks, chain guard, etc. I also started taking measurements and planning a few different frame, suspension, and rear set ideas!
We have decided to stay with a more traditional style cafe build for this bike, we will be running clubman bars, an extended tank, a cafe race style tail section, spoke wheels, rear sets, a nice set of exhaust chambers, etc.
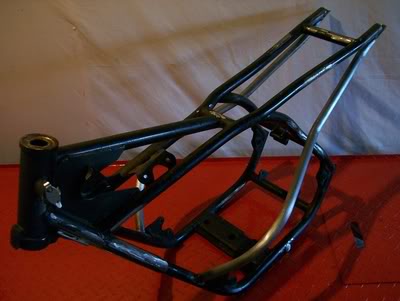
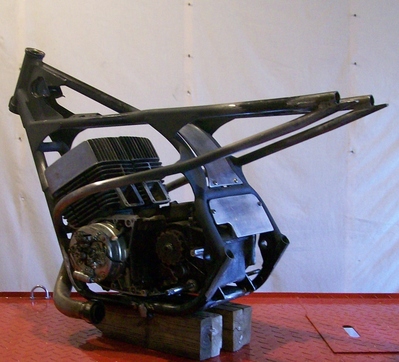
We were originally considering a mono shock for the rear suspension however to keep the traditional look we decided to keep dual shocks and upgrade them. I am going to back half the frame so I removed the lower rear frame rails as well as the shock mounts, the rear frame cross section, and a lot of the tabs. I also removed the rear peg brackets so that I can start to build the new mounts for the rear sets.
We were still talking about a couple of different ideas for the design of the rear frame section so we started to remove some more parts from the bike including all of the handlebar controls, the handlebars, gauges, top triple tree, headlight housing, headlight mounts, ignition coils, carburetors, etc.
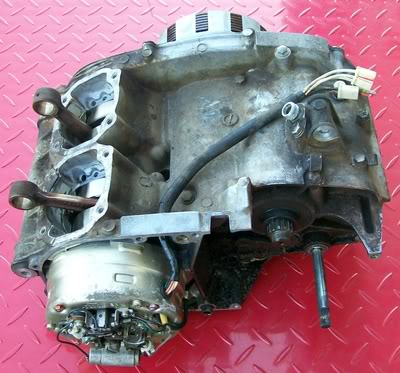
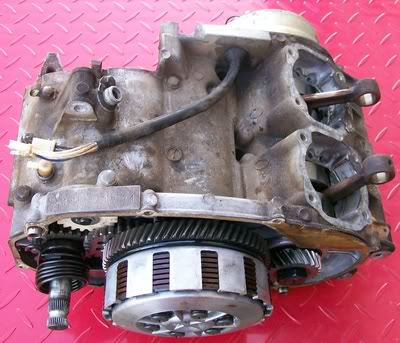
I removed the engine so that I could start rebuilding it and work on the frame some more!

I started to take the engine apart to get it ready for the rebuild!
joeyputt- Leading the Pack
- Posts : 755
Join date : 2010-08-25
Location : South of Dothan -
Re: DWMS Racing RD350 Cafe Racer Build! We Are Building The New Fiberglass Tail Section!
![]() by joeyputt Thu Jan 03, 2013 8:13 pm
by joeyputt Thu Jan 03, 2013 8:13 pm
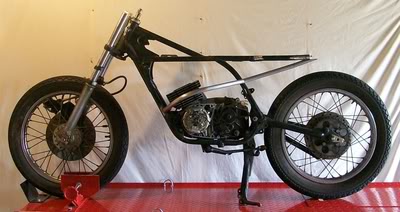
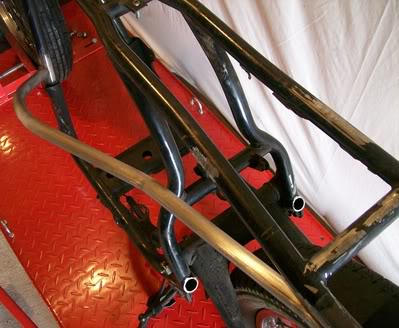
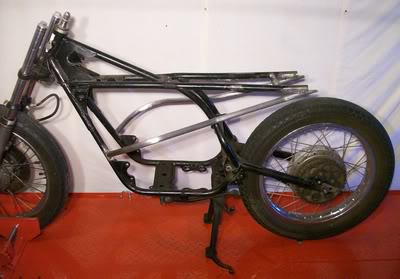
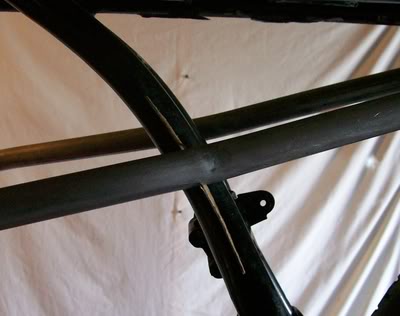
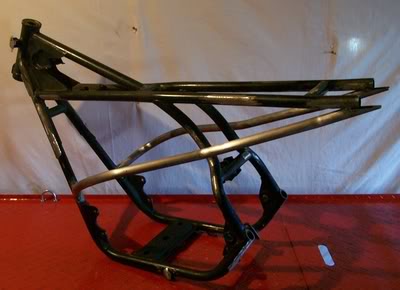
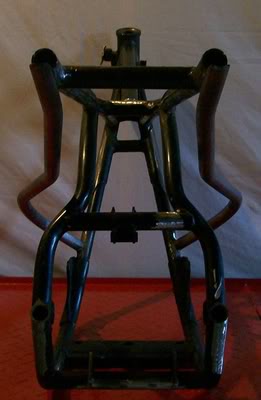
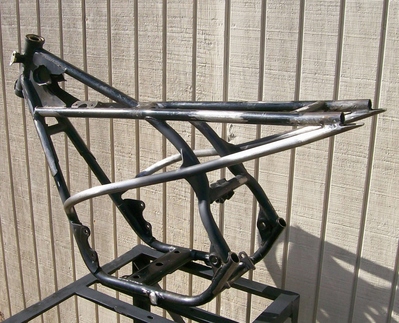
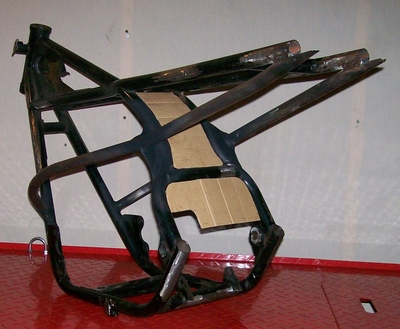
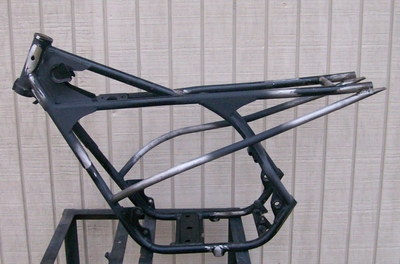
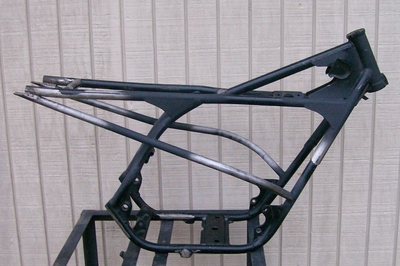
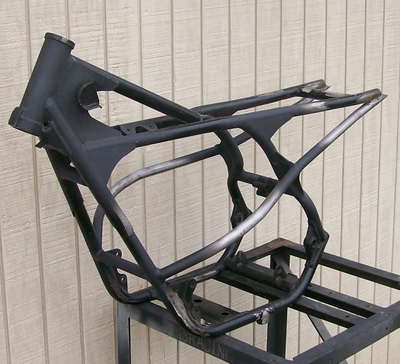
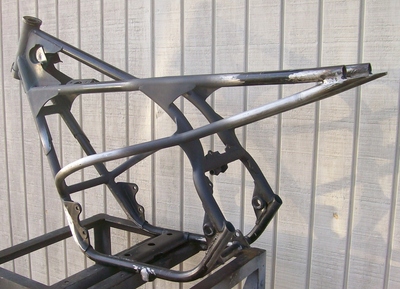
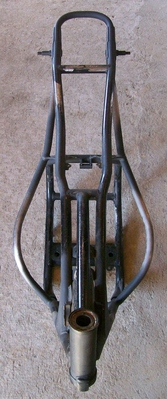
We decided to run a one piece frame rail from the front down tubes, around the cylinders, and all the way back to the rear shock location on each side of the frame! I set the bottom end of the engine back in the frame and bent the left frame tube and then built a matching frame tube for the right side.
I designed the new frame rail so that it does not touch the rear frame down tube and is about an inch away from it so that I can add two short pieces of tubing to form a triangle connection there. I am also going to extend the rear of the top frame tubes and once I have I will box in the rear triangle of the new frame section to incorporate the new shock mounts.
It is hard to get good photos that truly show the new dimensions that this frame design adds however I took a few to share with you all!

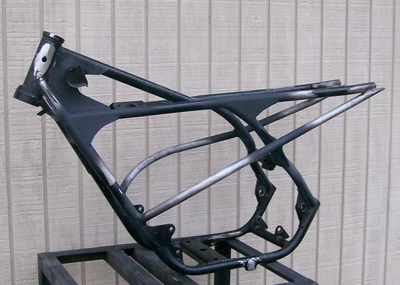
I added the new right side frame rail!

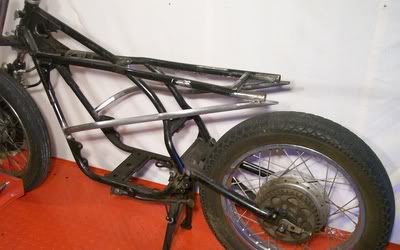
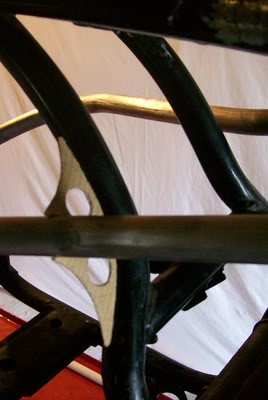
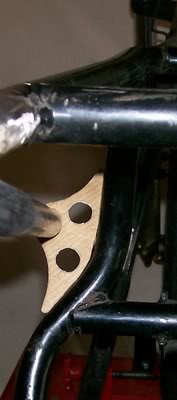
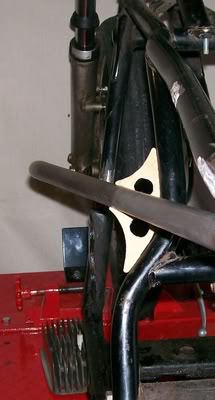
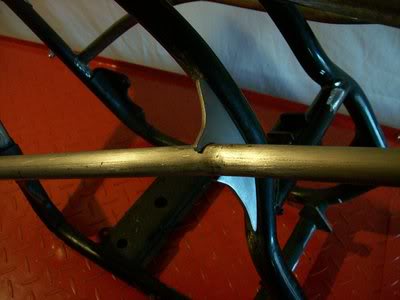
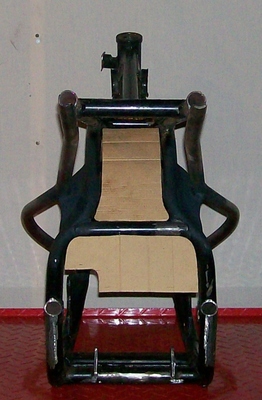
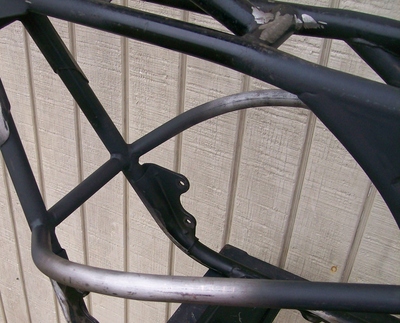
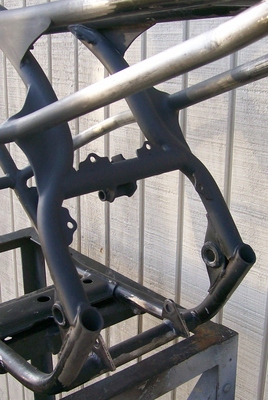
We had originally planned on connecting the new frame rails to the rear down tubes on each side of the frame with two one inch pieces of tubing to form a triangle however after looking at it we felt that a nice gusset would be stronger and would also look nicer! We designed a gusset and cut it out of cardboard so that we could set in on the frame to see how it would look and we really like the design so I am going to start building the gussets out of 3/16th's steel plate.
We are going to slightly curve the gusset so that it matches the curve of the rear down tubes when looking at the bike from the side.
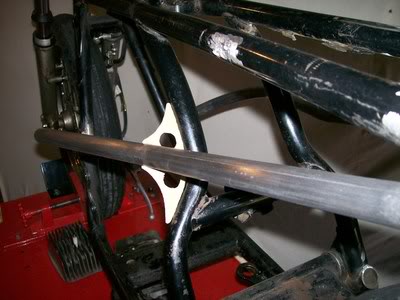
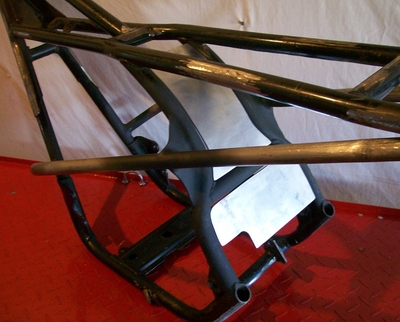
We are also going to skin the back side of the rear down tubes that you can see in this photo with some nice aluminum from the top of the frame down to the swingarm to protect the carburetors and engine from any water, dirt, or rocks that may come off of the rear tire. The down tubes have a really nice curve to them and they have a nice step in them on the sides so I am going to build the aluminum shield with the same curve and shape which I think will look really nice!
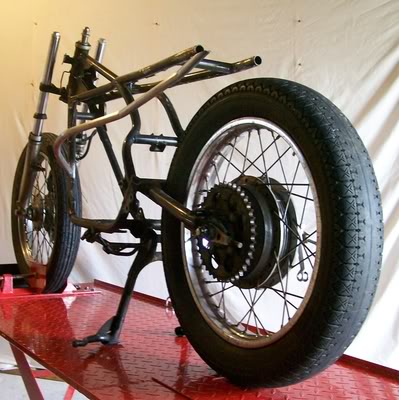
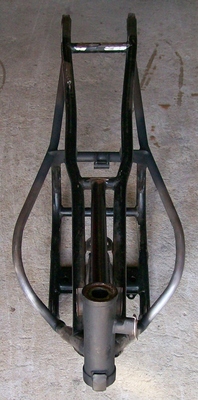
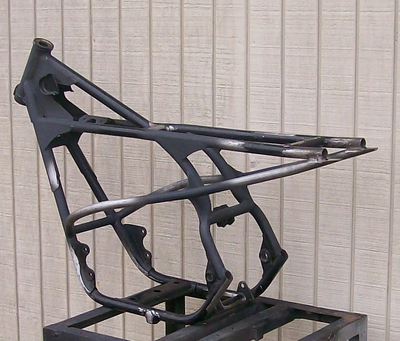
I removed the front forks, triple trees, the swingarm, and the rims from the frame so that I could finish removing the rest of the tabs from the frame and start to smooth it. I was able to finish cutting all of the tabs off and I removed the stamped sheet metal gussets from the front corners of the frame as well so that I can build nicer ones out of steel plate to replace them. I also removed the kick stand and its mount so that I can rebuild it after we have the new exhaust here. This bike will not have a center stand so I removed it and cut the mounts off, the mounts for the center stand were originally part of the lower rear engine mounts so I will also be building a weld in plate to connect the lower rear left and right engine mounts to make them stronger.

I also cut the gussets that we will be connecting the new frame rails to the rear down tubes with out of flat plate steel and curved them to match the curve of the rear down tubes when you look at the bike from the side, I have not welded the gussets to the frame yet however here are a couple photos so you all can see what they look like so far!

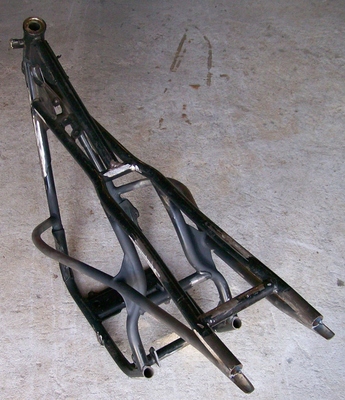
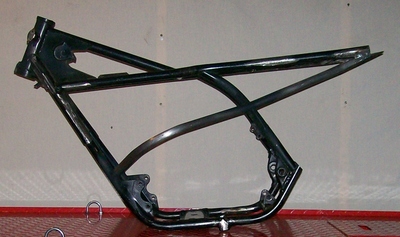
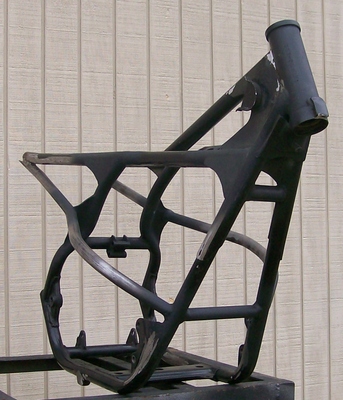
I welded the gussets in that connect the new frame rail on each side of the frame to the rear down tubes. I still have some more welding, shaping, and smoothing that I am going to do however I thought I would share some new photos for you all to enjoy!
This is one of my new favorite photos of the frame!


joeyputt- Leading the Pack
- Posts : 755
Join date : 2010-08-25
Location : South of Dothan -
Re: DWMS Racing RD350 Cafe Racer Build! We Are Building The New Fiberglass Tail Section!
![]() by joeyputt Thu Jan 03, 2013 8:14 pm
by joeyputt Thu Jan 03, 2013 8:14 pm
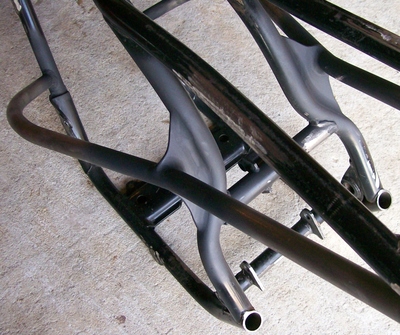
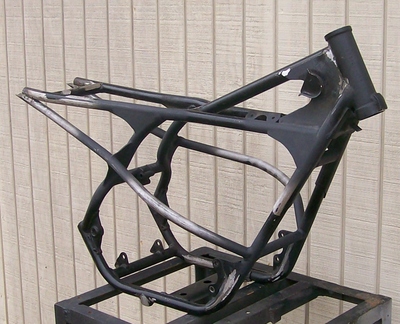
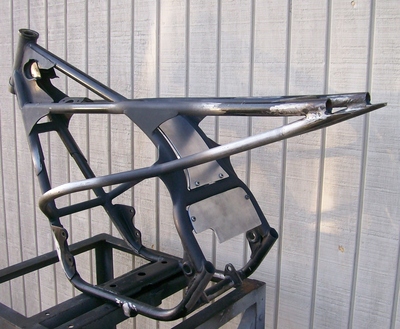
We had originally thought about building a one piece guard out of aluminum however I really want to mount the guard just inside the rear down tubes so that it is flush with the back of the rails when looking at the bike from the side, there is a cross bar connecting the two rear down tubes which would prevent me from mounting a one piece guard that way so we decided to build a two piece guard with the cross bar in between them which I think will look even nicer when everything is finished!
I started to play with design ideas and cut some templates out of cardboard so that we could see what the guards would look like. Here are a few photos of the basic design that I think we will be using, these pieces of cardboard are not the exact shape that I will be cutting out of aluminum and the aluminum pieces will sit flush with the back of the frame rails instead of how the cardboard is sitting however I wanted to post these photos to share the basic design with you all!


I really like this photo as it shows how you will not be able to see the guards from the side and how uniform the two new frame rails that I built are when looking at the frame from the side!
I cut the rear guards out of 1/8" inch thick aluminum plate, I still have some more filing and shaping that I want to do however I thought I would share a few photos of how they look so far!
The guards are not mounted yet, I taped them in place so that I could take a few photos of how they look on the frame.

joeyputt- Leading the Pack
- Posts : 755
Join date : 2010-08-25
Location : South of Dothan -
Re: DWMS Racing RD350 Cafe Racer Build! We Are Building The New Fiberglass Tail Section!
![]() by joeyputt Thu Jan 03, 2013 8:15 pm
by joeyputt Thu Jan 03, 2013 8:15 pm
I truly hope you all had a very nice holiday as well!
joeyputt- Leading the Pack
- Posts : 755
Join date : 2010-08-25
Location : South of Dothan -
Re: DWMS Racing RD350 Cafe Racer Build! We Are Building The New Fiberglass Tail Section!
![]() by joeyputt Wed Jan 09, 2013 7:52 pm
by joeyputt Wed Jan 09, 2013 7:52 pm
I still have more smoothing and finish work that I would like to do however I thought I would share some photos of the work I did today for you all to enjoy!

joeyputt- Leading the Pack
- Posts : 755
Join date : 2010-08-25
Location : South of Dothan -
Re: DWMS Racing RD350 Cafe Racer Build! We Are Building The New Fiberglass Tail Section!
![]() by hayweed Wed Jan 09, 2013 11:38 pm
by hayweed Wed Jan 09, 2013 11:38 pm

hayweed- Admin
- Posts : 2930
Join date : 2010-05-13
Age : 54
Location : Mobile,Al
Re: DWMS Racing RD350 Cafe Racer Build! We Are Building The New Fiberglass Tail Section!
![]() by Jack the Bagger Sat Jan 19, 2013 8:35 am
by Jack the Bagger Sat Jan 19, 2013 8:35 am
so how hard is it finding engine parts for these old Jap bikes ??

Jack the Bagger- Middle of the Pack
- Posts : 534
Join date : 2010-07-14
Age : 66
Location : Prattville
Re: DWMS Racing RD350 Cafe Racer Build! We Are Building The New Fiberglass Tail Section!
![]() by 72shovelhead Tue Jan 22, 2013 9:45 pm
by 72shovelhead Tue Jan 22, 2013 9:45 pm

72shovelhead- Rear of the Pack
- Posts : 415
Join date : 2011-09-20
Age : 68
Location : spencer field Fla.
Re: DWMS Racing RD350 Cafe Racer Build! We Are Building The New Fiberglass Tail Section!
![]() by joeyputt Thu Jan 24, 2013 10:27 am
by joeyputt Thu Jan 24, 2013 10:27 am
hayweed wrote:Looking great so far. I just can't picture in my head how you get the engine in it with those side tubes. Great frame work though.
Brother Hayweed when I originally designed the new frame rails I built them with enough clearance so that you could put the complete bottom end of the engine in the frame and then assemble the pistons, cylinders, and heads on to the engine inside the frame which would still be pretty easy as this bike is a two stroke so there are no cams, etc. Now that I have welded the new frame rails to the frame it looks like we have more room than I originally planned for so the engine may go in the frame with the pistons and cylinders on however I am going to stay with the original plan when I install the engine during the final assembly as the frame will have new paint and I want to make sure that I do not scratch it!
joeyputt- Leading the Pack
- Posts : 755
Join date : 2010-08-25
Location : South of Dothan -
Re: DWMS Racing RD350 Cafe Racer Build! We Are Building The New Fiberglass Tail Section!
![]() by joeyputt Thu Jan 24, 2013 10:36 am
by joeyputt Thu Jan 24, 2013 10:36 am
Jack the Bagger wrote:looks great , the RD350 was one of many I lusted after in my ute
so how hard is it finding engine parts for these old Jap bikes ??
Brother I know a lot of people loved these motorcycles back when they first came out and now they are one of the most popular two stroke motorcycles for cafe racer style builds. As far as getting parts most of the vintage Japanese motorcycles are very easy to get parts for and the parts are also normally very economical in price compared to American motorcycles.
joeyputt- Leading the Pack
- Posts : 755
Join date : 2010-08-25
Location : South of Dothan -
Re: DWMS Racing RD350 Cafe Racer Build! We Are Building The New Fiberglass Tail Section!
![]() by joeyputt Thu Jan 24, 2013 10:37 am
by joeyputt Thu Jan 24, 2013 10:37 am
72shovelhead wrote:Going to be an interesting bike you are building, looking forward to seeing the final project.
Thank You Brother, I hope you continue to enjoy this build!
joeyputt- Leading the Pack
- Posts : 755
Join date : 2010-08-25
Location : South of Dothan -
Re: DWMS Racing RD350 Cafe Racer Build! We Are Building The New Fiberglass Tail Section!
![]() by joeyputt Thu Jan 24, 2013 10:38 am
by joeyputt Thu Jan 24, 2013 10:38 am
I am thinking about adding one more mounting tab to the lower guard and we will be using smaller stainless steel hardware for the final assembly however I took a few photos to share with you all!
joeyputt- Leading the Pack
- Posts : 755
Join date : 2010-08-25
Location : South of Dothan -
Re: DWMS Racing RD350 Cafe Racer Build! We Are Building The New Fiberglass Tail Section!
![]() by joeyputt Thu Jan 24, 2013 9:23 pm
by joeyputt Thu Jan 24, 2013 9:23 pm
joeyputt- Leading the Pack
- Posts : 755
Join date : 2010-08-25
Location : South of Dothan -
Re: DWMS Racing RD350 Cafe Racer Build! We Are Building The New Fiberglass Tail Section!
![]() by hayweed Thu Jan 24, 2013 9:34 pm
by hayweed Thu Jan 24, 2013 9:34 pm
hayweed- Admin
- Posts : 2930
Join date : 2010-05-13
Age : 54
Location : Mobile,Al
Re: DWMS Racing RD350 Cafe Racer Build! We Are Building The New Fiberglass Tail Section!
![]() by joeyputt Wed Feb 27, 2013 10:57 am
by joeyputt Wed Feb 27, 2013 10:57 am
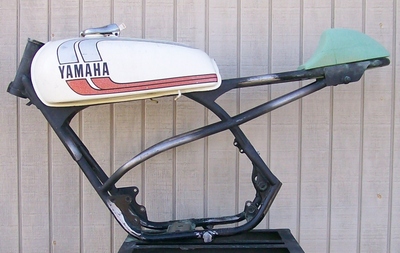
We have been playing with different ideas for the fuel tank and after trying another tank we decided to build a full one piece body that will incorporate the stock fuel tank, the body will be one smooth piece from the front of the tank to the rear of the tail section!
I am going to go ahead and start building the body and now that I know how long it will be I can also go ahead and start finishing the rear frame work and build the top mounts for the rear shocks.
The steel seat pan I build will be welded to the rear of the tank so that I can fully enclose and smooth the area where they join. We are going to utilize the stock front tank mounts and build center and rear mounts that will have rubber dampers between the body and the frame to absorb any vibration.
joeyputt- Leading the Pack
- Posts : 755
Join date : 2010-08-25
Location : South of Dothan -
Re: DWMS Racing RD350 Cafe Racer Build! We Are Building The New Fiberglass Tail Section!
![]() by joeyputt Sun Mar 03, 2013 9:11 pm
by joeyputt Sun Mar 03, 2013 9:11 pm
joeyputt- Leading the Pack
- Posts : 755
Join date : 2010-08-25
Location : South of Dothan -
Re: DWMS Racing RD350 Cafe Racer Build! We Are Building The New Fiberglass Tail Section!
![]() by hayweed Sun Mar 03, 2013 9:34 pm
by hayweed Sun Mar 03, 2013 9:34 pm
hayweed- Admin
- Posts : 2930
Join date : 2010-05-13
Age : 54
Location : Mobile,Al
Re: DWMS Racing RD350 Cafe Racer Build! We Are Building The New Fiberglass Tail Section!
![]() by joeyputt Mon Mar 04, 2013 10:31 pm
by joeyputt Mon Mar 04, 2013 10:31 pm
I was able to talk to Brother Bluesmokey this morning and we decided on the final measurements of 12 inches for the seat pan and 7 inches for the rear cowl so I bent some tubing today and built the rear hoop for the frame! I made the rear hoop by bending two pieces of tubing and welding them together in the middle, I also shaved the tubing down on the ends so that it would fit inside of the original top frame rails for added strength.
We also decided where we are going to place the top shock mounts, I am going to build a new box section with plates that will be welded over the area where the original top frame rails, the new side frame rails, and the new rear hoop meet and have the top shock mounts running through the box section just below the frame rails so I made the template for the box section today as well.
joeyputt- Leading the Pack
- Posts : 755
Join date : 2010-08-25
Location : South of Dothan -
Re: DWMS Racing RD350 Cafe Racer Build! We Are Building The New Fiberglass Tail Section!
![]() by hayweed Wed Mar 06, 2013 10:28 pm
by hayweed Wed Mar 06, 2013 10:28 pm
hayweed- Admin
- Posts : 2930
Join date : 2010-05-13
Age : 54
Location : Mobile,Al
Re: DWMS Racing RD350 Cafe Racer Build! We Are Building The New Fiberglass Tail Section!
![]() by joeyputt Wed Mar 06, 2013 10:36 pm
by joeyputt Wed Mar 06, 2013 10:36 pm
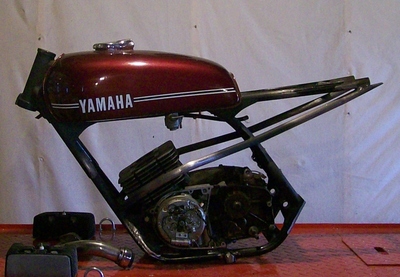
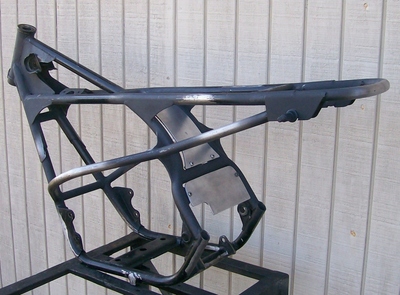
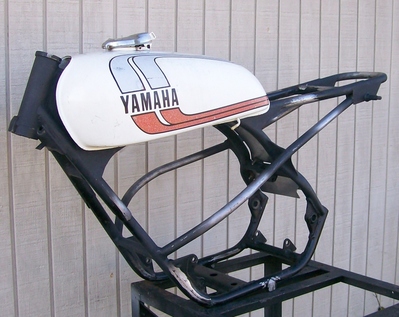
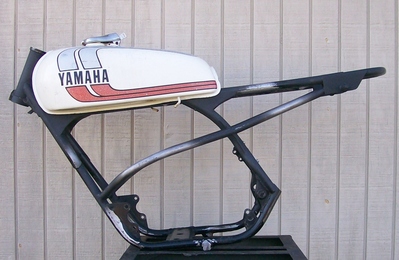
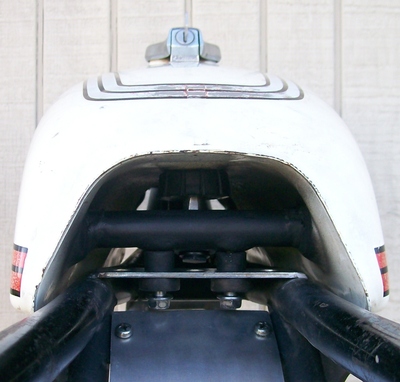
Here are some photos for you all to enjoy, I still have a lot of work to do before the box sections are completed however I wanted to share some photos of how they look this evening! Brother Bluesmokey also sent a beautiful tank that looks brand new inside that we will be using on this build so I set it on the frame and took a few extra photos!
joeyputt- Leading the Pack
- Posts : 755
Join date : 2010-08-25
Location : South of Dothan -
Re: DWMS Racing RD350 Cafe Racer Build! We Are Building The New Fiberglass Tail Section!
![]() by joeyputt Wed Mar 13, 2013 8:32 pm
by joeyputt Wed Mar 13, 2013 8:32 pm
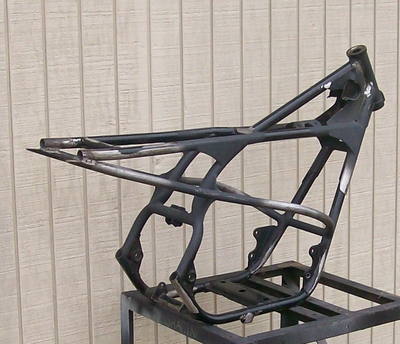
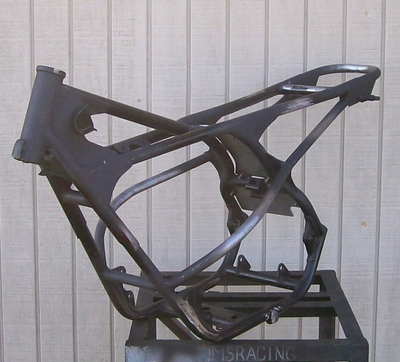
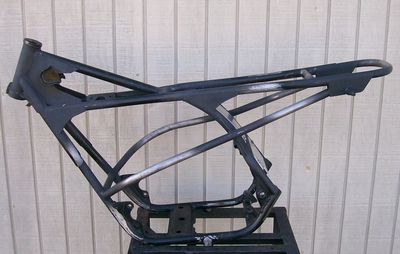
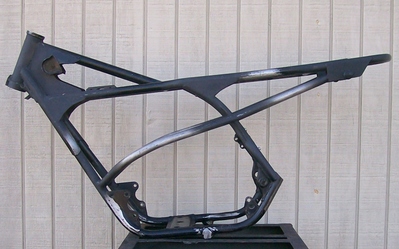
Here is a new photo of the frame now that I have the rear hoop and shock mounts that we built in place!
The seat pan and rear cowl will cover the side of the frame rails and the top half of the new rear shock mount plates that I built so that we can keep a nice clean body line that follows the bottom of the fuel tank all the way down the side of the bike to the end of the rear cowl when we are done however here are a couple photos that will give you all an idea of the shape we are using for the rear cowl.

joeyputt- Leading the Pack
- Posts : 755
Join date : 2010-08-25
Location : South of Dothan -
Re: DWMS Racing RD350 Cafe Racer Build! We Are Building The New Fiberglass Tail Section!
![]() by joeyputt Fri Mar 15, 2013 10:12 pm
by joeyputt Fri Mar 15, 2013 10:12 pm
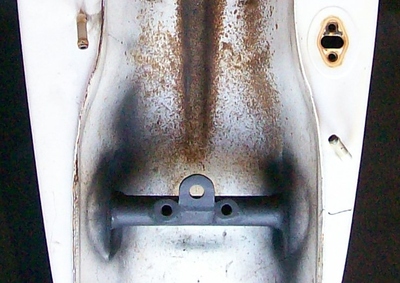
From the factory the RD350 fuel tank does not have an actual rear mount. The factory design has the tank sitting on a single rubber underneath and a single rubber on each side so that it can not move from side to side, the seat is what holds the tank down. I designed the new bolt down rear mount to have all of the same factory contact points and to be fully rubber mounted as well.
On the bottom of the fuel tank I removed the rubber from the side cups and I also removed the bottom half of the cup on each side so that I could drop a length of tubing that I cut into the cups and weld it in, once I had the tubing welded into place I drilled two holes into it and welded in two nuts. For the center mount I made a tab and welded it to the tubing.
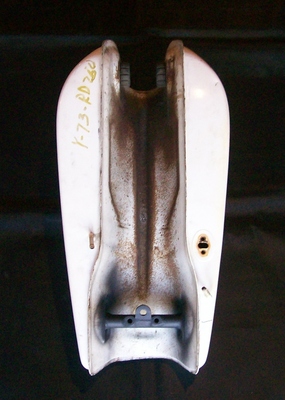
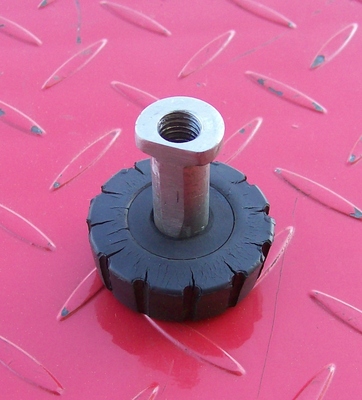
I wanted the rubber to be replaceable on the center mount so I built a bolt in shouldered post and threaded the middle of it so that it mounts to the tab that I welded onto the center of the tubing I added on the bottom of the fuel tank. The rubber is a factory RD350 front fuel tank mount with an additional rubber insert for added cushion. The rubber shown in the photo is a old one that I used for test fitting and it will be replaced with a new rubber for final assembly of the motorcycle.
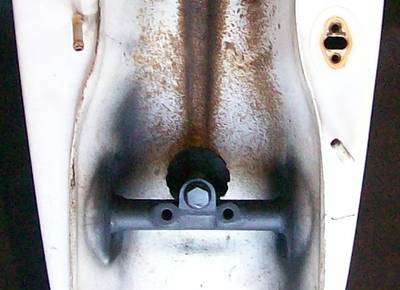
This photo shows the center mount bolted to the new tubing I added to the bottom of the fuel tank.
For the frame mount I made a cross brace and welded it to the frame, I drilled two large holes in the brace to hold the shouldered rubber isolators that the fuel tank sits on and the tank mounting bolts run through so that they are fully rubber mounted.


This photo shows the tank mounted to the frame, there will be a couple more washers and I will also install a set of rubber collars around the center rubber mounts between the new tubing on the tank and the frames cross brace for final assembly.
joeyputt- Leading the Pack
- Posts : 755
Join date : 2010-08-25
Location : South of Dothan -
Re: DWMS Racing RD350 Cafe Racer Build! We Are Building The New Fiberglass Tail Section!
![]() by hayweed Fri Mar 15, 2013 10:23 pm
by hayweed Fri Mar 15, 2013 10:23 pm
hayweed- Admin
- Posts : 2930
Join date : 2010-05-13
Age : 54
Location : Mobile,Al
Re: DWMS Racing RD350 Cafe Racer Build! We Are Building The New Fiberglass Tail Section!
![]() by joeyputt Wed Mar 20, 2013 8:52 pm
by joeyputt Wed Mar 20, 2013 8:52 pm
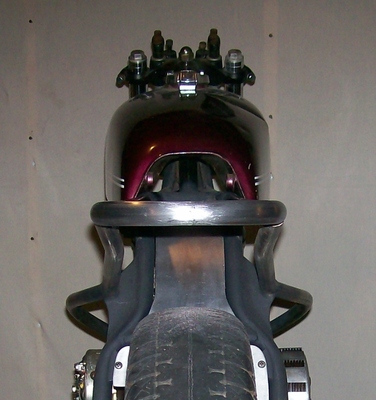
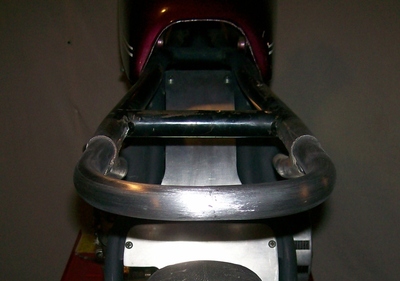
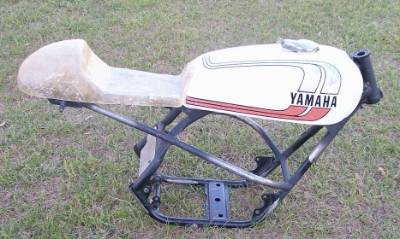
I wanted to lay the fiberglass right on the the bike so that we could mold the front of the seat over the rear of the gas tank and match the frame perfectly so I taped the back of the tank and the frame and added strips of cardboard to the sides of the frame for a nice flat surface, after I taped the tank and the frame I added the foam that we shaped for the rear cowl and taped it in place as well.
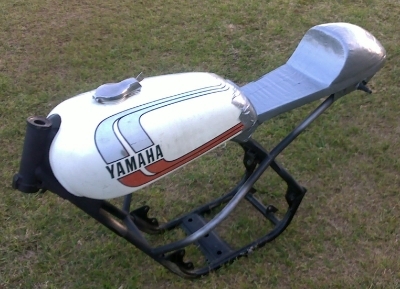
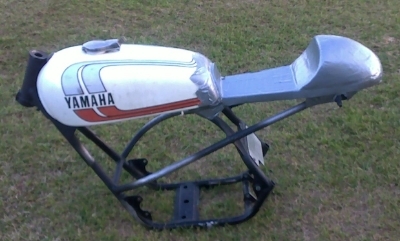
Today I started to lay the fiberglass on the frame and I was able to finish the first layer, I am going to shape the front where we molded the tail section over the rear of the fuel tank some more and trim the bottom some more as well before I start to add the additional layers of fiberglass however I wanted to go ahead and share a couple photos of how she looks this evening!

joeyputt- Leading the Pack
- Posts : 755
Join date : 2010-08-25
Location : South of Dothan -
Re: DWMS Racing RD350 Cafe Racer Build! We Are Building The New Fiberglass Tail Section!
![]() by Sponsored content
by Sponsored content
Sponsored content
Page 1 of 2 • 1, 2 ![]()
» DWMS Racing XS1100 Big Bore 1196cc Engine Build!
» DWMS Racing CB450 Shop Flat Track Race Bike! New XR750 Style Tail!
» CB450 498cc big bore engine by DWMS Racing! Before and after photos!
» DWMS RACING CB550F SUPER REVERSE PORT! NEW PHOTO!